A (simple) guide to installing multiple CUDA toolkits
So that you can finally stop banging your head against the wall!
If you’re a machine learning/deep learning researcher, chances are that you use NVIDIA’s CUDA libraries and runtime on a daily basis (at least indirectly). Running different versions of software, frameworks, and libraries require different CUDA versions. Moreover, some of the terminologies around drivers, toolkits, and runtimes may be confusing. Let’s go through them one by one.
The driver
The role of the NVIDIA display driver is simply to allow the operating system and GPU to communicate with each other. The display driver package consists of a CUDA user-mode driver and a kernel-mode driver, which are basically driver components to run applications on the GPU. You don’t need to worry about all this too much, but keep in mind that you cannot have multiple versions of the driver on your machine.
The CUDA toolkit
This package contains the CUDA runtime, and various CUDA libraries and tools. When you build an application (like PyTorch) with CUDA, the CUDA toolkit is what the source code looks for. Unlike the driver, you can install multiple versions of the toolkits at the same time. This allows you to build software with different CUDA versions, depending on if you’re building source code is that very old, and therefore requires an older CUDA version, and so on. Since the drivers and toolkits keep updating, not all driver versions are compatible with all toolkit versions. A compatibility chart can be found here. To choose a suitable toolkit and driver version, start by finding out what CUDA toolkit version your application requires. Then, find the driver version that supports these CUDA toolkit versions. Voila! That’s really it!
Using local runtimes
Performing installation via a package manager like apt-get or using a .deb file doesn’t allow us to easily specify where to install the libraries and if we should override existing symlinks, etc. The default way of installation is by writing a command like sudo apt install nvidia-cuda-toolkit. An alternative way is to install using local runfiles. Here’s an example of how to install CUDA11.3 using a local runfile.
Go to the CUDA 11.3 downloads page.
Select the options applicable for your machine. In the “installer type” select runfile (local). I’m using an Ubuntu machine, so here is what my screen looks like
Follow the steps in the Installation instructions. Specifically, download the file and run the script with sudo (to allow writing into
/usr/local).You should be greeted by a screen like this:
Type “accept” and press Enter.
This brings you to the CUDA Installer. If you do not have a driver yet (if
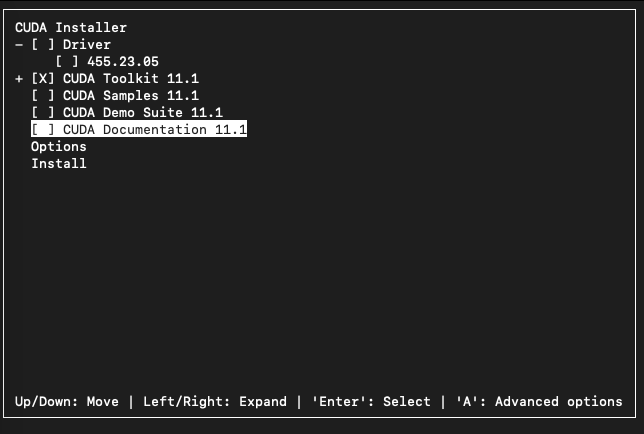
nvidia-smiworks then you have a driver installed), leave the driver checked. I have one installed already, so I’m turning off the check. I also do not want to install the samples, demo suite, or documentation, so I check them off as well. Here is what my installer looks like.Now go to Options. If this is your preferred version of CUDA, then keep the “Create symbolic link” option checked. This will create a symlink
/usr/local/cuda -> /usr/local/cuda-11.3for convenience. Then hit Install. You should be greeted with a screen like this.Do not worry about the warning about the CUDA Driver. There are instructions about updating the
PATHandLD_LIBRARY_PATHenvironment variables, but let’s worry about it later.Rinse and repeat the above steps with other CUDA versions. I downloaded CUDA11.1 and CUDA10.2 local runfiles, and followed the same instructions. Here’s what my setup screens looked like.
CUDA 11.1 - Everything went smoothly.
CUDA10.2 - I get an error upon installation. The error is
Checking the log at
/var/log/cuda-installer.log, I see the following error:If you see the same error, you need to override the symbolic links for gcc and g++ to point to the required version. Doing these symlink changes manually is messy, and you can break something along the way. I used
update-alternatives(more info here). What it does is help the user have a preference among multiple versions of software, and help manage the symlinks accordingly. Here is an example of how to use this. I used the commandsudo update-alternatives --config gccandsudo update-alternatives --config g++commands to override the defaults to gcc/g++-8. This leads to a successful installation.
The libraries and runtime are saved in
/usr/local/. Here is what mine looks like after installing all versions:Now update the
PATHandLD_LIBRARY_PATHenvironment variables in.bashrc(or in the configuration file of your favorite shell). Here is what mine looks like:
And we’re done!! To summarize, to ensure a clean installation of multiple versions of CUDA:
Always install from the runfile - this is the minimal installation method, with the most amount of control over installation parameters.
DO NOT mix install types (e.g., dpkg/apt and runfile)
Set
PATHandLD_LIBRARY_PATH(andCUDA_HOMEin some cases) to make sure the required software finds the appropriate version.
I hope this helps. Let me know if you come across problems with this method or have feedback or suggestions.


